
How to Fix a Gate Valve: A Step-by-Step Troubleshooting and Repair Guide
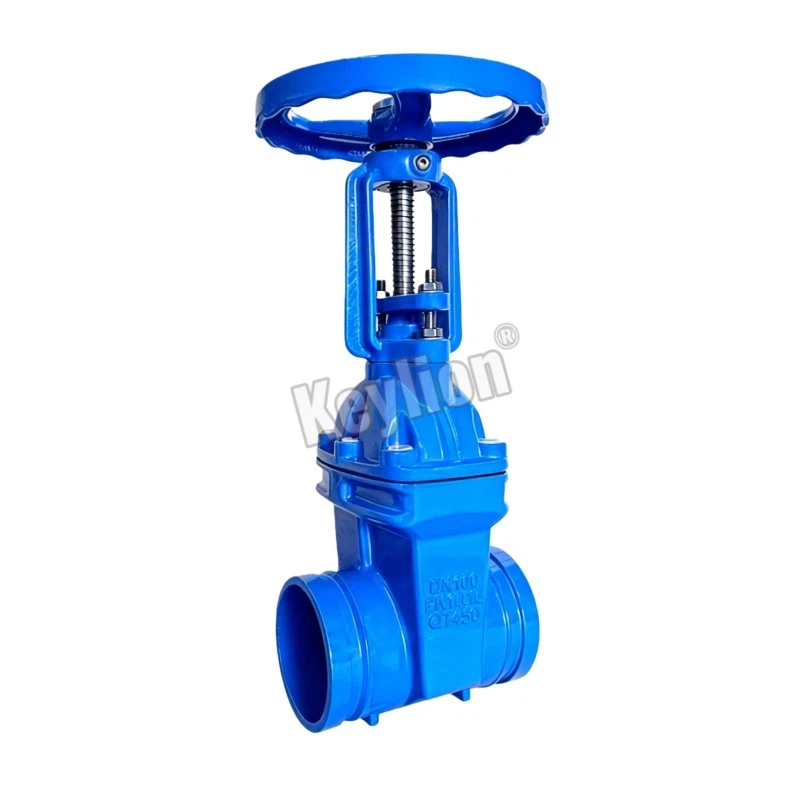
A [gate valve] that is leaking, stuck, or failing to provide a tight shut-off is a common issue in piping systems. While replacement is sometimes necessary, many gate valves-especially well-constructed ones-can be successfully repaired. This guide walks you through diagnosing common problems and the methodical process of fixing a gate valve.
⚠️ Critical Safety First: Always isolate the valve from system pressure, drain the relevant section of the pipeline, and verify it is safe to work on before attempting any repair. For systems carrying hazardous, hot, or potable media, consult a professional.
Step 1: Diagnose the Problem
Accurate diagnosis is key to an effective repair. Here are the most common failures:
● Leakage from the Stem (Packing Leak): Fluid seeps out around the stem when the valve is open or closed. This is the most common and easiest fix.
● Leakage through the Seat (Internal Leak): Fluid continues to flow when the valve is fully closed. This indicates worn/damaged seat rings or the gate/disc.
● The Valve is Stuck or Very Hard to Operate: The handwheel won't turn, or requires excessive force. Causes include corrosion, debris, a bent stem, or a seized stem nut.
● The Stem Turns but the Gate Doesn't Move: The connection between the stem and the gate (like the T-slot) is stripped or broken.
Step 2: Gather Tools and Materials
You will typically need:
● Correct wrenches (pipe wrenches, adjustable wrenches)
● Screwdrivers
● Packing pick or small awl (for removing old packing)
● Wire brush, emery cloth
● Replacement Parts Kit: This should match your valve size and type and usually includes stem packing (graphite or PTFE), a new gasket for the bonnet, and possibly new seat rings or a gate.
Pro Tip: For a durable and long-lasting repair on industrial valves, ensure you use high-quality replacement parts. For valves under constant use, consider upgrading to premium graphite packing for better temperature and chemical resistance.
Step 3: The Repair Procedure (Disassembly, Repair, Reassembly)
A. Isolation and Disassembly
1.Isolate the valve and drain the pipeline.
2.For rising stem (OS&Y) valves, close the valve fully first. This retracts the stem into the body, protecting the threads.
3.Remove the bonnet bolts or union nut. You may need to tap the bonnet gently with a soft hammer to break the gasket seal.
4.Carefully lift the bonnet assembly (including the stem and gate) out of the valve body.
B. Inspection and Cleaning
1. Thoroughly clean all parts with a wire brush and solvent.
2. Inspect critically:
○ Stem: Check for pitting, corrosion, or bent threads. A damaged stem often must be replaced.
○ Gate/Disc: Look for scoring, erosion, or corrosion on the sealing surfaces. Minor imperfections can sometimes be smoothed with emery cloth.
○ Seat Rings: Inspect for similar wear or grooves. In many standard gate valves, seats are integral to the body and cannot be easily replaced without specialized tools.
○ Stem Nut: Inside the handwheel or yoke, check for worn threads.
C. Fixing Specific Issues
● To Replace Stem Packing (Fix Stem Leak):
1. Remove the handwheel and gland follower (the flange compressing the packing).
2. Extract all old packing material from the packing chamber using a packing pick.
3. Wrap new packing rings neatly around the stem, staggering the joints. Use the recommended number of rings.
4. Reinstall the gland follower and handwheel. Do not over-tighten. Snug it down, then operate the valve a few times. A slight weep is normal initially; you can tighten the gland incrementally after a few cycles if needed.
● To Address a Leaking Seat/Internal Leak:
○ For minor seat or gate damage, very fine lapping compound can be used to "lap" the surfaces together for a better seal (a specialist technique).
○ For significant damage, replacement of the gate and/or seat rings is required. This may not be economical for standard valves compared to replacement of the entire valve.
D. Reassembly and Testing
1. Place a new bonnet gasket.
2. Carefully lower the gate into the body, ensuring it aligns with the seat grooves.
3. Reinstall the bonnet assembly and tighten bolts evenly in a crisscross pattern.
4. Slowly open and close the valve several times to ensure smooth operation.
5. Pressure Test: Re-pressurize the system and check for leaks at the bonnet, stem, and, most importantly, through the closed seat.
When Repair is Not Advisable: Consider Replacement
Sometimes, fixing a gate valve is not the best course of action. Consider a full valve replacement if:
● The valve body itself is cracked or severely corroded.
● Critical internal parts (like integral seats) are damaged and not replaceable.
● The cost of specialized repair parts and labor exceeds 60-70% of the cost of a new, reliable valve.
● The valve is obsolete, and parts are unavailable.
For frequent repairs, it may indicate the valve is underspecified for the service. In such cases, selecting a more robust valve designed for your specific application-such as a resilient-seated gate valve for slurry or a fully encapsulated ductile iron valve for corrosive environments-can provide a better long-term solution. Our [guide to selecting the right valve] can help you choose a more durable option.
Conclusion
Fixing a gate valve is a systematic process of diagnosis, careful disassembly, and part replacement. While stem packing repairs are commonly successful, addressing internal seat leaks can be more complex. Investing in quality valves from the start, like those built with precisely machined ductile iron components and renewable seat rings, minimizes downtime and repair frequency. For persistent issues or major internal damage, replacing the valve with a suitably specified model is often the most reliable and economical long-term decision.
Disclaimer: This guide is for informational purposes. Valve repair can involve high-pressure systems and hazardous materials. If you are unsure about any step, always consult with or hire a qualified professional. Always refer to the specific manufacturer's repair manual for your valve model.